Installing Apache Spark (PySpark): The missing “quick start” guide for Windows
So you saw the latest Stack Overflow chart of popularity of new languages, and–deciding maybe there’s something to this “big data” trend after all–you feel it’s time to get familiar with Apache Spark.
Stack overflow has never seen growth like the tensorflow tag -@drob #ddtx18. My take: the deep learning hype is real pic.twitter.com/9Mt56WZr2j
— Emily Robinson (@robinson_es) January 27, 2018
Sure, you could get up and running with a few keystrokes on UNIX/MacOS, but what if all you have at home is an old Windows laptop? I tried following the installation instructions from the O’Reilly book Learning Spark (which, like many wonderful tech reference materials, may be available for free from your local library, but the chapter is a bit sparse on details for Windows users and just didn’t work “out of the box” for me. Instead, the following is based on the official Quick Start Guide, trial and error, and lots of Googling.
This guide assumes the following:
You’re on a Windows 8.1 Pro system. Similarly-old versions of Windows would probably also be similar. Windows 10 users might want to check out its Linux Subsystem support instead.
You have Anaconda Python already installed.
You have removed any previously installed or otherwise conflicting versions of Hadoop. You’ve downloaded a pre-compiled stable version of Apache Spark with Hadoop included (for me, this was spark-2.2.1-bin-hadoop2.7)
Your Java is currently up-to-date (v.8 update 161, at the time of this writing).
If you see a command that starts with >, these are commands you can enter into your Command Prompt. (You don’t enter the “>” part).

Open Command Prompt as Administrator. You can do this by right-clicking the windows icon (usually bottom left corner of toolbar) and choosing “Command Prompt (Admin)” option.
-
Unzip the downloaded Spark .tar file using 7-Zip or similar utility. Move the contents of this folder to a new directory you’ve made
> mkdir C:\sparkI usually just do this via the Windows GUI rather than on the command line. You can open up explorer in the current directory anytime by typing> explorer .(Make sure to include the period for current directory) -
Download winutils.exe. Choose the version that corresponds to the version of Hadoop you downloaded. Move to a new directory you’ve made just for this purpose:
> mkdir c:\hadoop\bin -
Create environment variables for SPARK_HOME and HADOOP_HOME and related PATH variables. You can do this in the Command Prompt
> set SPARK_HOME=c:\spark> set HADOOP_HOME=c:\hadoop> set PATH=%SPARK_HOME%\bin;%PATH%> set PATH=%HADOOP_HOME%\bin;%PATH%or right-click the Windows icon, navigate to System, choose Advanced System Settings, then click on the button for Environment Variables. -
Activate your conda virtual environment with the version of Python you’d like to use. You could make a new environment (recommended!) to try things out, or YOLO just
> conda install pysparkinto your main Python environment. Note on commands:> source activate snakes(UNIX/MacOS) is just> activate snakesin Windows where your environment’s name in both cases is “snakes” Also make an environment variable for your Python path (your command will differ, but it’ll be something like the following):> set PYTHONPATH=C:\Users\Lauren\Anaconda -
You need to enable access to the default scratch directory for Hive. First, make sure the directory C:\tmp\hive is created; if it doesn’t exist, create it. Second, you need to give it permission to access winutils.exe. Navigate back to where you put this .exe file then run the permission command
> cd c:\hadoop\bin
> winutils.exe chmod -R 777 C:\tmp\hive
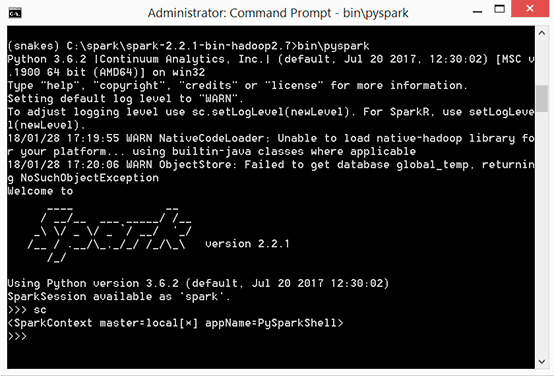
Pause here to make sure Spark is working.
Run > C:\spark\bin\pyspark and you should see a welcome screen like this:
If you see the Spark ASCII art, you’re in. If you don’t, try closing and restarting the Command Prompt. If it’s still not working, more tutorials are here, here, and here.
If you do see the Spark welcome screen, you can now run some of the example scripts included with the pre-built Spark download to ensure its working, or try out a few lines from the official Quick Start Guide.
>>> textFile = sc.textFile("README.md")
>>> textFile.first()
'# Apache Spark'
At this point you should also be able to access the Spark UI from your favorite browser at http://localhost:4040.
Back in the Command Prompt, exit Spark with the >>> quit() command.